How to install Dell Mobile Connect app on any Windows 10 device


Dell Mobile Connect
Image Courtesy: Dell.com
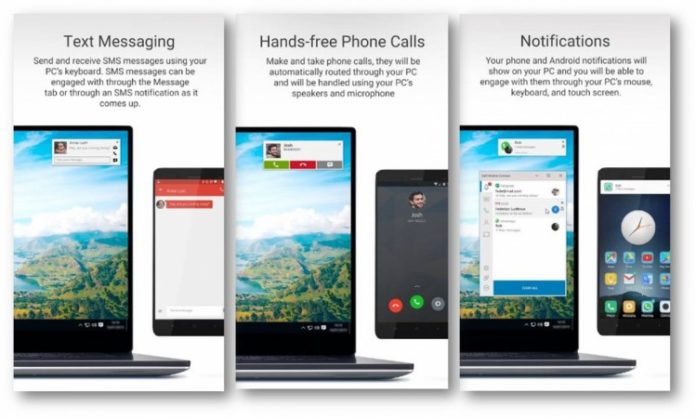
Dell recently introduced Windows 10 ‘Continuum’ like feature called Mobile Connect at CES 2018. The Mobile Connect app comes with the new laptops recently launched by Dell. The feature lets you connect your Android or iOS device to your PC via Bluetooth and you can send, receive messages or calls on your PC.
However, this feature was exclusive to Dell PCs at the launch but not anymore. A simple trick lets you install the app on your PC. Here’s how to install Mobile Connect app on any Windows 10 PC:
  • Make sure that the Developer Mode is on. To do that go to settings > Update and Security > For Developers -> turn on Developer Mode.
  • Wait for few minutes for the developer package to be installed.
  • Download the .appx package of the Dell Mobile Connect App from here.
  • After downloading, install the package by just double-clicking the file.
  • The App Installer would pop up and click Install button to install the app and wait for it to finish.
Now in order to be able to use the app, you may also need to install the drivers provided by Dell. Here’s how you can do that:
  • Download the drivers from here.
  • After downloading, open the .exe file.
  • Instead of clicking the Install button, click the Extract button and extract to the folder that you want to extract to.
  • After the extraction is successful, close the dialog box.
  • Go to the folder where you extracted the files.
  • Run the DellMobileConnectDriversSetup.exe as administrator.
  • Click yes if prompted.
  • Go through the setup and install the drivers.
  • After installation is completed, press Finish.
Make sure you’ve downloaded Dell Mobile Connect app on your mobile from Play Store on Android 5.0+ and App Store on iOS 10+. After installing, go through the linking process between both devices and you are good to go.
Comments

Popular posts from this blog

How To Know The Balance Of Banks Account By Giving Missed Call

Missed call balance checking number of major Indian Banks #1 Axis Bank We have already written a detailed article dealing with Axis Bank’s balance checking process. Anyways, the number in question is-  09225892258 .  #2 Andhra Bank Not too familiar with the bank, but managed to find the missed called balance enquiry number associated with it. The number is-  09223011300 . Make a call to this number using your registered mobile number. The call will get disconnected and you will get  SMS  containing  account balance details . #3 Allahabad Bank The number associated with Allahabad Bank is-  09224150150 . The same process of giving a missed call is to be done. SMS containing account balance details will reach the customer’s registered mobile number. #4 Bank of Baroda A very popular Bank in India. It is Government run one. The balance enquiry number is- 09223011311 . Give call to this number and get SMS containing details to your registere

How To: Why is VirtualBox only showing 32 bit guest versions on my 64 bit host OS?

My Host OS is a 64-bit version of Windows 10, VirtualBox categorically refused to display any 64-bit guest OS in the  Create Virtual Machine  dialog box. This was super annoying because all my ISOs were 64-bit therefore I couldn’t use them until I fixed this problem. Uninstalling and reinstalling VirtualBox made no observable difference so I booted into the BIOS to see what I could find there. I have a HP Pavilion g6 2231tx.  As a side note, a few months ago I made another idiotic mistake: I enabled a bunch of BIOS passwords to make myself feel  secure  but then forgot how to disable them! Thank God I didn’t enable a  Supervisor Password  or else I would have to replace the system board.  That’s seriously the only way to get around that one; resetting the CMOS won’t fix a forgotten Supervisor password.  Thankfully, I remembered, the Hard Drive password and the Power-On Password, so after surmounting those obstacles, I removed those passwords and tried to see if there was an

How To Install IDM Integration Extension in Any Browser Manually

1. All you need to do is visit IDM installed directory in Program files, here is its path for navigation in Explorer “C:\Program Files\Internet Download Manager”. 2. And drag-n- drop  IDMGCExt.crx  extension onto Chrome://extensions page or you can open that page by Chrome menu>Tools>Extensions. That’s it IDM Integration extension will be installed for chrome.  *Make sure you checked ‘Hide Extensions for Known file types’ on Folder Options dialog to see IDMGCEXt with crx extension .